Which means the painting table is now clear to continue on Warhammer Quest....
Here are the mooks:
woensdag 5 september 2012
maandag 3 september 2012
Good to go!
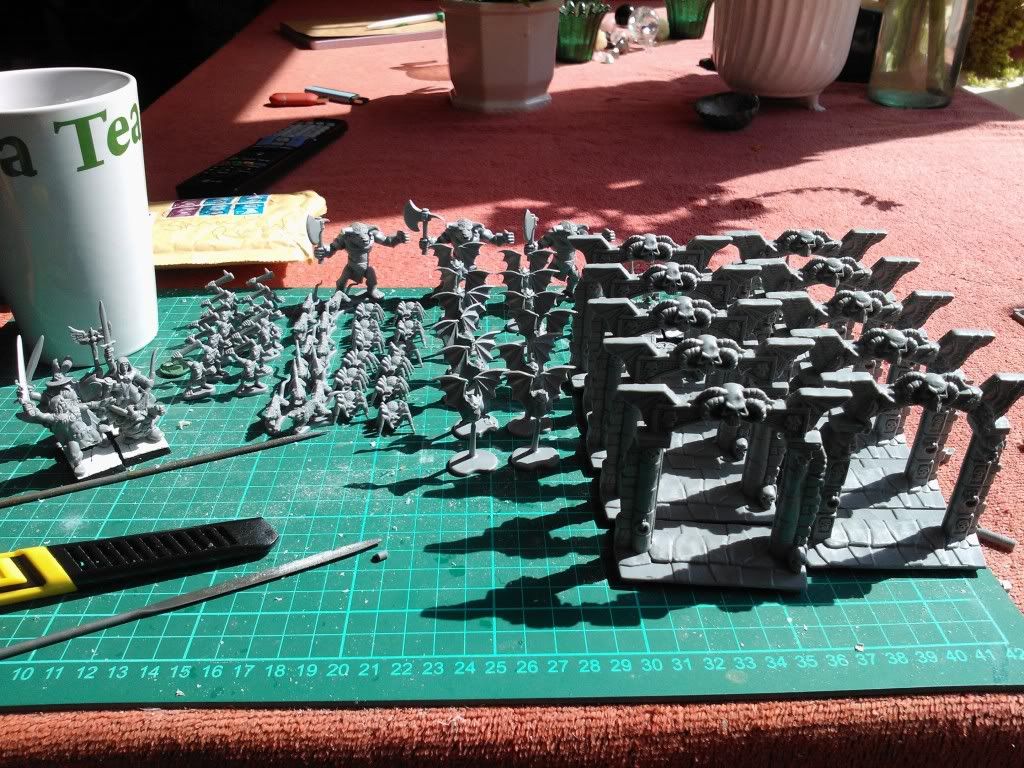
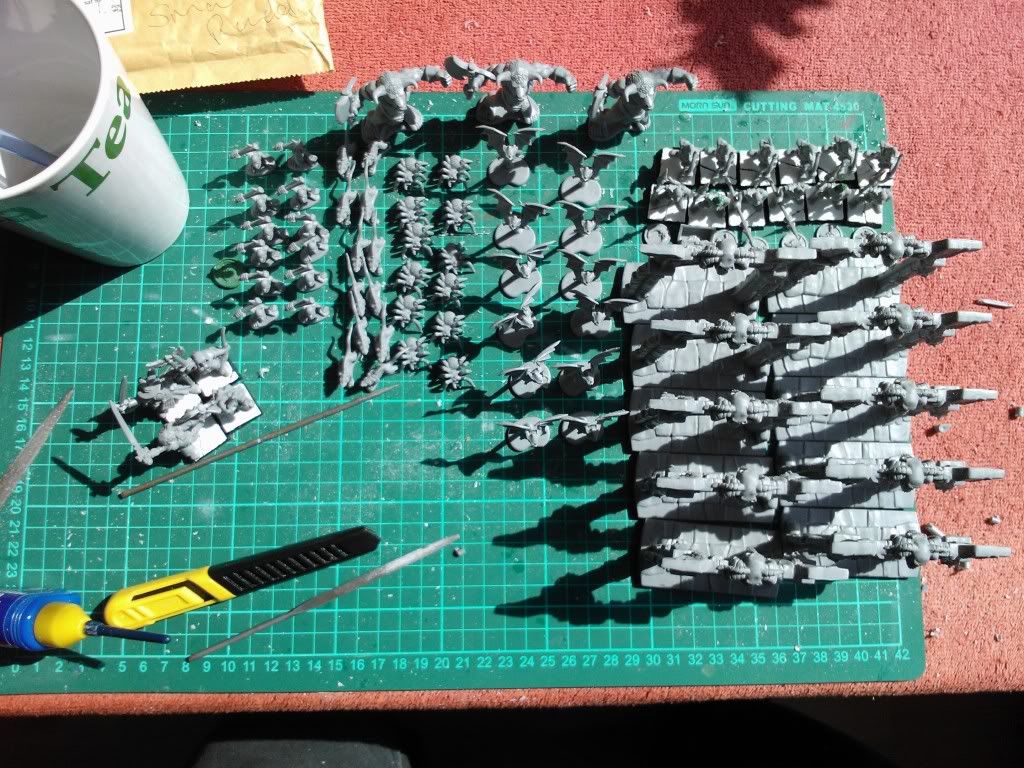
Whew! Just finished clipping and cleaning all the Warhammer Quest figures from their sprues. So we are now officially able to play the game! Hopefully, that will also be an incentive to actually keep painting at a steady pace...
Anyway, here they are:
Any figures you don't see here are either already painted, or in the process of being painted.
Except for the Goblins, they're hiding in the back like the sneaky gits they are:
That's all for now....
Anyway, here they are:
Any figures you don't see here are either already painted, or in the process of being painted.
Except for the Goblins, they're hiding in the back like the sneaky gits they are:
That's all for now....
zondag 2 september 2012
What I've been up to...
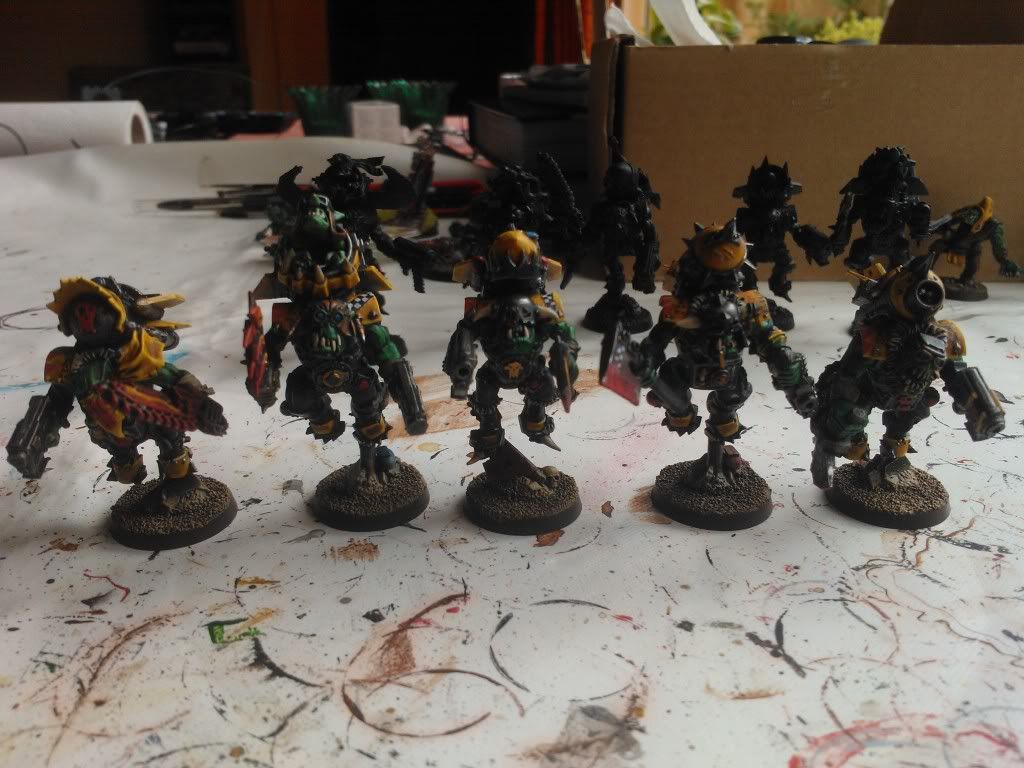
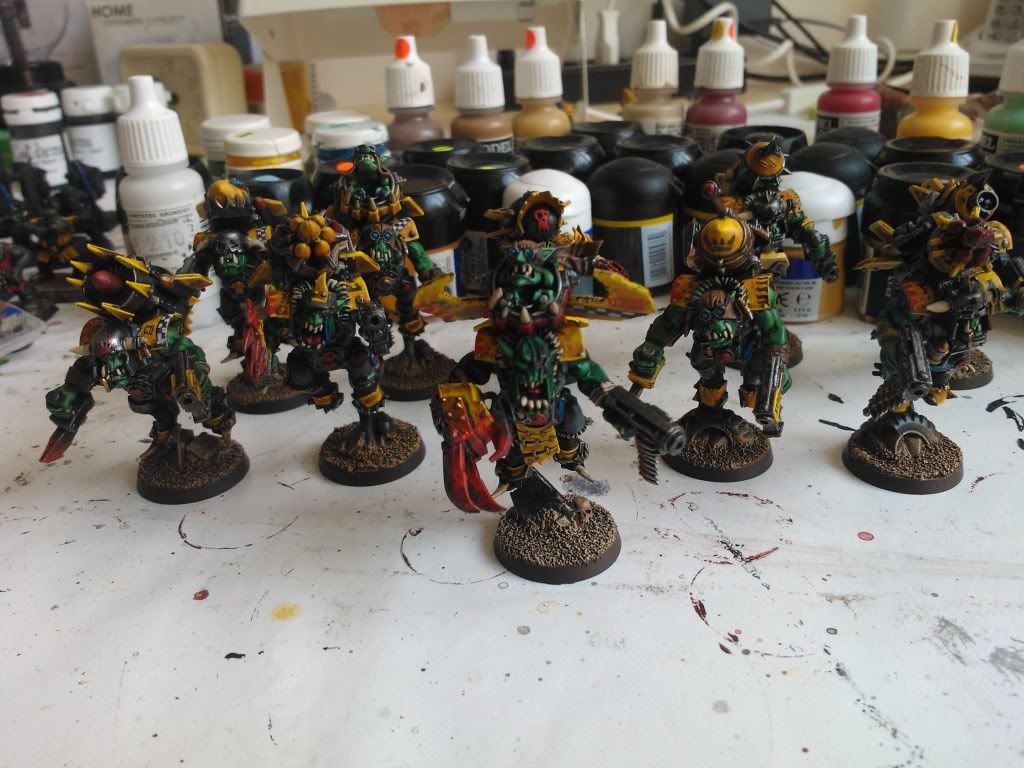
Well, in July, I had painted that large Ork mob. In august (after 2 weeks of holiday, couldn't bring the hobby stuff) I've been working on a unit of 10 stormboys.
But sadly that seems to have stalled out just before the finish line.... (I still need to do the Nob's skin and the detailing on the remaining Stormboys, but I just can't bring myself to actually sit down and do it.)
Here's the group of five I've managed to finish:
So, what have I been up to instead of painting Orks?
Corridors and their denizens, apparently.
I've been busy taking the misses' Warhammer Quest miniatures from the sprue. That way we can at least play the game until I get everything painted. And I will save some time when I get around to painting them... No more cleanup before primering! Straight to paint! :)
As an extra, I've also been mulling over the (un)feasibility/insanity of building 3D Quest terrain... (I know, I just can't help myself!) I've got some ideas, but I'm not ready to share them yet. First I need to decide wether I'll go ahead with this or not... A.k.a.: Try to talk myself out of it.
Which in turn meant Ive also been eyeing my Space Hulk 3D notes and references again.... (Sigh... I'm not making this easy on myself, am I?)
Through this, I've also encountered another SH3D blog I hadn't seen before: Check your corners. Take a look, he builds pretties!
See you next time!
But sadly that seems to have stalled out just before the finish line.... (I still need to do the Nob's skin and the detailing on the remaining Stormboys, but I just can't bring myself to actually sit down and do it.)
Here's the group of five I've managed to finish:
So, what have I been up to instead of painting Orks?
Corridors and their denizens, apparently.
I've been busy taking the misses' Warhammer Quest miniatures from the sprue. That way we can at least play the game until I get everything painted. And I will save some time when I get around to painting them... No more cleanup before primering! Straight to paint! :)
As an extra, I've also been mulling over the (un)feasibility/insanity of building 3D Quest terrain... (I know, I just can't help myself!) I've got some ideas, but I'm not ready to share them yet. First I need to decide wether I'll go ahead with this or not... A.k.a.: Try to talk myself out of it.
Which in turn meant Ive also been eyeing my Space Hulk 3D notes and references again.... (Sigh... I'm not making this easy on myself, am I?)
Through this, I've also encountered another SH3D blog I hadn't seen before: Check your corners. Take a look, he builds pretties!
See you next time!
donderdag 19 juli 2012
Ruined!
As in, I made a ruin....
The main structure is resin, I added the base and the loose rubble and pieces of wall on the floor (the original resin item just had the two standing walls, without any debris at all... Very unnatural looking):
dinsdag 17 juli 2012
Mob is done
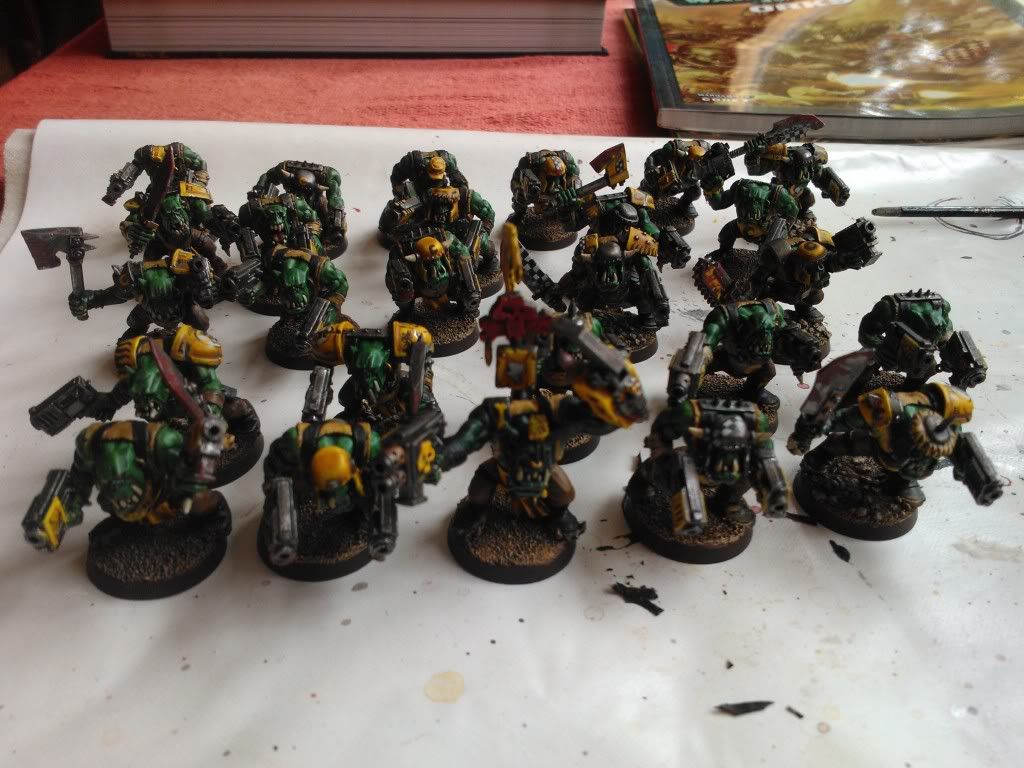
Well, the Ork mob, I showed the first batch of two posts ago, is finished. That's 26 more bodies for my Waaagh!
Here they are:
| Again, apologies for the cellphone cam, camera still needs fixing/replacing. But it's just not high on the priorities list. Mortgage and food first, and all that. |
All in all, I'm satisfied. Tried some (wash-related) trickery to speed up the painting a bit. It seems I have found a satisfactory balance between speed and quality.
vrijdag 13 juli 2012
ZAP! Fzzzt...
I almost had a DIY electrostatick flocker today...
A while ago I found some instructions to make a static grass applicator from an electric flyswatter and a small sieve. So today, I set to work making one. The instructions were clear and easy and I had it together in no time. :-D To be on the safe side, I built the low-powered version, because it meant less (no) messing around with the circuit board, plus it meant not overriding a safety feature.
On to testing!
I prepped a piece of plasticard with wood glue, stuck the ground pin into the glue, and fired her up. The LED in the handle lighted up cheerfully, grass went through the sieve, contacted the glue below it.... And stood up nicely!
However, when finished, I accidentally touched the ground clip with the sieve. That made a pretty, blue, ZAP!
I thought nothing of it, assuming electric bug zappers were supposed to go ZAP. I mean, the instructions for the DIY static grass build even noted that you needed to discharge the thing in this way, if you built the high-powered version. So it should be harmless, right?
On the next base: Glue applied, ground stuck in, LED glowed happily... But gone was the standy-uppy-magic!?
Ripped it open again, checked all the connections I made, all was well.
Re-assembled it, tried again. LED works fine, but no magic...again.
So, as it didn't work properly anyway, I decided to convert it over to the high-powered version after all and see if that would change anything.
And it did!
Now the LED wouldn't light up anymore as well.... :-C
So here I am, with a nice, shiny, new, static-grass-applicator-shaped inert object.
Still can't figure out why it failed on me.
I don't think I did something wrong building it, it wasn't that difficult, and the instructions were clear.
Best guess is that either the ZAP shorted out something important after all, but all the components seemed intact.
I could just have had a faulty bugzapper, I didn't test it before the conversion to static grass applicator (I didn't like the idea of having atomised bug-gore in my basing).
So right now, I'm debating with myself: Do I assume faulty goods and get another bug zapper? It's only a few bucks after all. Or do I chalk this one up to experience and leave well enough alone?
Luckily, my 6th Ed 40K rulebook arrived yesterday, so I won't have to get bored while deciding the issue. :-D
I'm off to the couch for a nice read....
Bye!
A while ago I found some instructions to make a static grass applicator from an electric flyswatter and a small sieve. So today, I set to work making one. The instructions were clear and easy and I had it together in no time. :-D To be on the safe side, I built the low-powered version, because it meant less (no) messing around with the circuit board, plus it meant not overriding a safety feature.
On to testing!
I prepped a piece of plasticard with wood glue, stuck the ground pin into the glue, and fired her up. The LED in the handle lighted up cheerfully, grass went through the sieve, contacted the glue below it.... And stood up nicely!
However, when finished, I accidentally touched the ground clip with the sieve. That made a pretty, blue, ZAP!
I thought nothing of it, assuming electric bug zappers were supposed to go ZAP. I mean, the instructions for the DIY static grass build even noted that you needed to discharge the thing in this way, if you built the high-powered version. So it should be harmless, right?
On the next base: Glue applied, ground stuck in, LED glowed happily... But gone was the standy-uppy-magic!?
Ripped it open again, checked all the connections I made, all was well.
Re-assembled it, tried again. LED works fine, but no magic...again.
So, as it didn't work properly anyway, I decided to convert it over to the high-powered version after all and see if that would change anything.
And it did!
Now the LED wouldn't light up anymore as well.... :-C
So here I am, with a nice, shiny, new, static-grass-applicator-shaped inert object.
Still can't figure out why it failed on me.
I don't think I did something wrong building it, it wasn't that difficult, and the instructions were clear.
Best guess is that either the ZAP shorted out something important after all, but all the components seemed intact.
I could just have had a faulty bugzapper, I didn't test it before the conversion to static grass applicator (I didn't like the idea of having atomised bug-gore in my basing).
So right now, I'm debating with myself: Do I assume faulty goods and get another bug zapper? It's only a few bucks after all. Or do I chalk this one up to experience and leave well enough alone?
Luckily, my 6th Ed 40K rulebook arrived yesterday, so I won't have to get bored while deciding the issue. :-D
I'm off to the couch for a nice read....
Bye!
woensdag 11 juli 2012
Proof of life
It is true, I still exist...
It's just that over the last month real life hit, and it hit hard.
At the moment, in the light of 6th edition, I'm doing a bit of work expanding my Ork army for Warhammer 40k. (and hoping, unlike 5th, I get more than 2 games played in this edition...)
Quite some time ago, a friend gave me a WIP scratchbuilt buggy for my Ork army. Last week I finally got around to finishing and getting it ready for paint:
All I had to do to finish it was build the front wheel suspension, add the crew, the left-side exhaust and fuel barrel. Oh, and add some Orky glyphs.
The twin linked Rokkit launcher is magnetised and can be swapped for the twin linked Big Shoota I originally got with the scratchbuild.
I also started paint on an extra unit of Ork slugga boys:
This is just the first batch (of 3), the second set of 9 boys is on the painting table at the moment. When those are finished, it's just 6 boys and a Nob left to do.
With this mob, I'm trying to get some more speed in my painting, aiming for a good look as a unit, instead of paying a lot of time and attention to individual models. So far, it seems to work reasonably well. I'm not suddenly super fast, bit at least I'm not (as) glacially slow anymore. And at the same time, I'm satisfied with the quality and look of them.
It's just that over the last month real life hit, and it hit hard.
At the moment, in the light of 6th edition, I'm doing a bit of work expanding my Ork army for Warhammer 40k. (and hoping, unlike 5th, I get more than 2 games played in this edition...)
Quite some time ago, a friend gave me a WIP scratchbuilt buggy for my Ork army. Last week I finally got around to finishing and getting it ready for paint:
All I had to do to finish it was build the front wheel suspension, add the crew, the left-side exhaust and fuel barrel. Oh, and add some Orky glyphs.
The twin linked Rokkit launcher is magnetised and can be swapped for the twin linked Big Shoota I originally got with the scratchbuild.
I also started paint on an extra unit of Ork slugga boys:
This is just the first batch (of 3), the second set of 9 boys is on the painting table at the moment. When those are finished, it's just 6 boys and a Nob left to do.
With this mob, I'm trying to get some more speed in my painting, aiming for a good look as a unit, instead of paying a lot of time and attention to individual models. So far, it seems to work reasonably well. I'm not suddenly super fast, bit at least I'm not (as) glacially slow anymore. And at the same time, I'm satisfied with the quality and look of them.
Abonneren op:
Posts (Atom)