Spent the entire afternoon trying to buy flock for the hills...
The
local modelshop in my city has closed, so I headed to the next city
over.
Only to discover that the (formerly excellent) shop there had
dropped the entirety of their model train and scenery assortment!
Luckily they knew of a specialist model train shop in the next town over again.
Managed to find that place, a quaint little shed of a shop, and they had flock to boot!
Only took me several hours, to buy a few bags of flock. Unbelievable.
So hopefully, I should be able to start flocking next time I have some hobby-time.

dinsdag 30 juli 2013
maandag 29 juli 2013
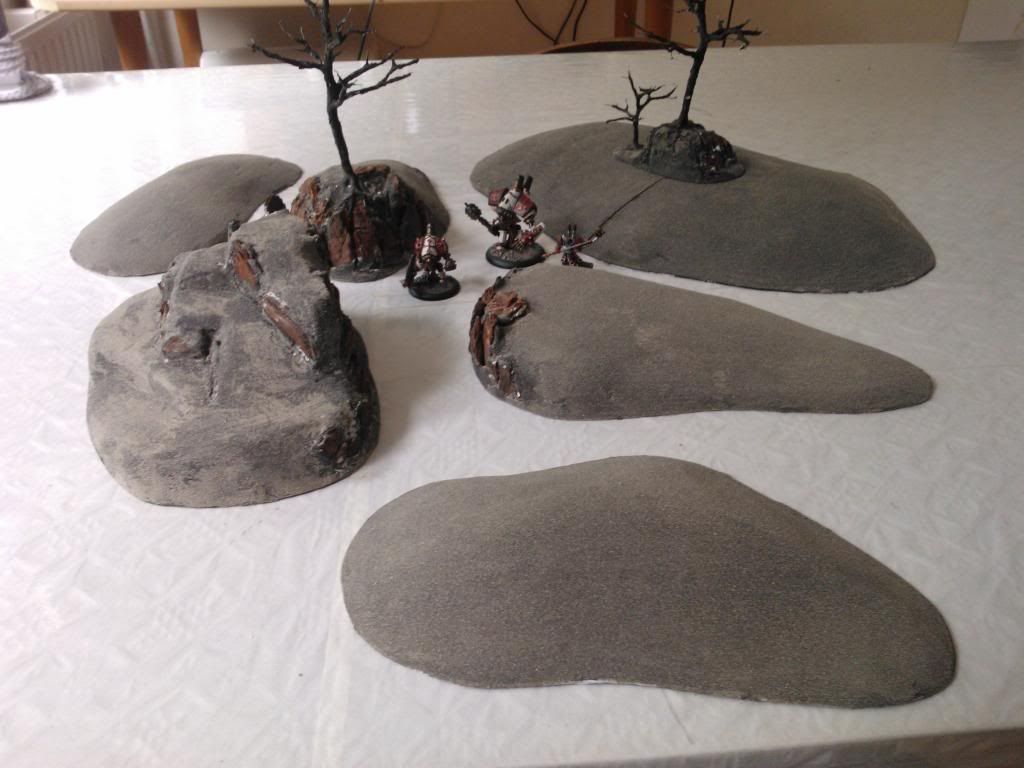
Less boring and black now,
these hills have colour!
Had a nice little spare hour and half, without rain, this evening:

I'm rather happy with the way the rocky faces turned out:
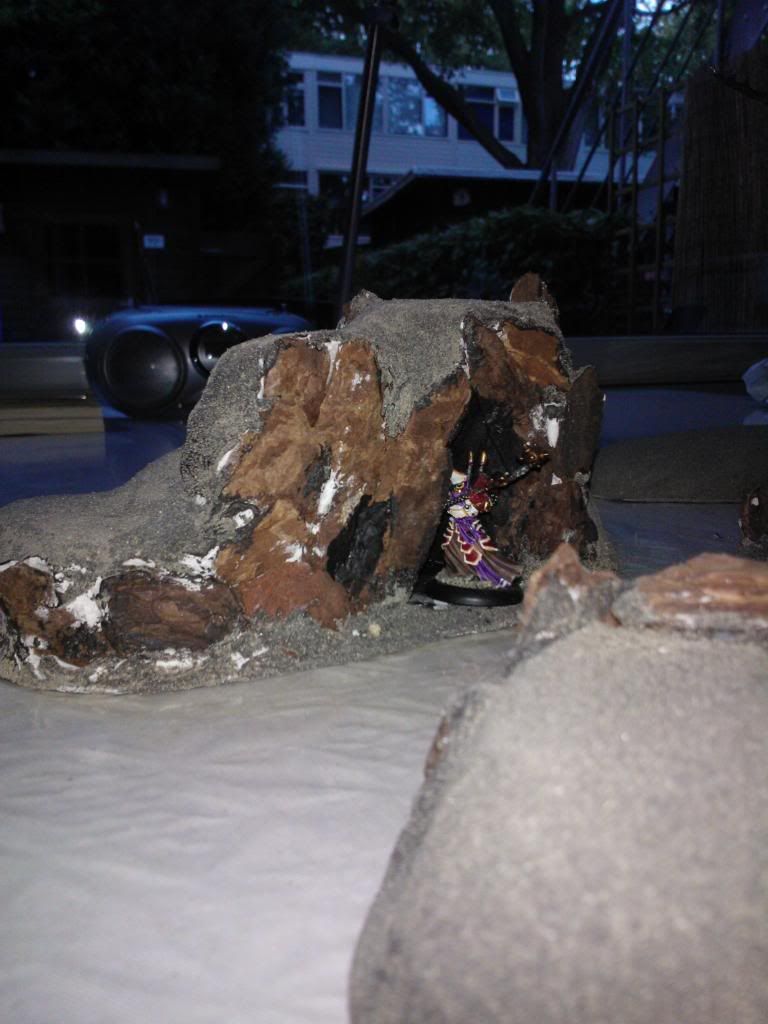
 Especially the cave:

Ofcourse, creepy caves like this attract a certain type of crowd:
 Luckily I have a knight ready and painted to come and pick her up. :-)
The hills and rocks were painted with simple crafts paints and simple large flat crafts brushes (a 2" and 1" wide if I guess correctly).
I still need to paint the creepy trees, maybe add some washes to the rocks for variation. This I'll hopefully do tomorrow.
Once the paint on those is dry, I can proceed and cover the majority of my paintjob back up again with flock.* :-D
These hills are meant to fit onto a verdant green wargames table after all...
*: Speaking of which, does anyone know of a way to get a nice, thick covering of static grass that actually stands up?
Had a nice little spare hour and half, without rain, this evening:

I'm rather happy with the way the rocky faces turned out:


Ofcourse, creepy caves like this attract a certain type of crowd:

The hills and rocks were painted with simple crafts paints and simple large flat crafts brushes (a 2" and 1" wide if I guess correctly).
I still need to paint the creepy trees, maybe add some washes to the rocks for variation. This I'll hopefully do tomorrow.
Once the paint on those is dry, I can proceed and cover the majority of my paintjob back up again with flock.* :-D
These hills are meant to fit onto a verdant green wargames table after all...
*: Speaking of which, does anyone know of a way to get a nice, thick covering of static grass that actually stands up?
zondag 28 juli 2013
No progress on the hills.
As the title says....
The last few days the weather has been somewhat... wet. Which meant no painting on the hills.
You see, painting hills (at least the way I do it) I anticipate to be rather messy.
As I want to keep the living room, kitchen and sewing/games room clean of paint-splattered walls, that means painting outside.
Not something I want to do in the rain, especially not during a summer storm!
So, I had a nice sit inside today with my paints. Which resulted in this miniature getting finished:
 A while ago I told you about the Dungeoneering/Chivalry/Questing-all-rolled-into-one project I was working on, as a companion to painting the misses' Warhammer Quest?
Well, this is the second hero to get finished for that! (Number one was the female Dwarf Slayer).
And the first of heroes to get/have a retinue.
You see, on the workdesk are 4 archers, 3 spearmen, a Sergeant, herald and squire to follow this violent man around! And now that I have his heraldry figured out (It took me quite a while, and several changes of heart to settle on this colourscheme), they can get painted too.
I just need to finish a few minor conversions on the sergeant and (dismounted version of the) squire.
My plan is to alternate (at random) between painting WHQ miniatures and painting for my own project. The long term plan for my own project is to amass a stable of both Dungeoneering Parties (which are basically small bands of all heroes. My Slayer and a few of her buddies will form one.) and Individual Heroes (Who will get retinues of lesser warriors, like the knight above.). Some groups will most likely blur the line between these two classifications, but we'll see. I mainly plan to assemble groups that I think are interesting rather than stick rigidly to this divide. And ofcourse to collect a menagerie of adversaries, both human and inhuman. :-D
Oh, and Gunbird has successfully lured me back into Samurai... No major disruption, as I'll just add them to my DCQ-a-r-i-1* project as an eastern band of heroes. ;-D I already have a (smallish) pile of them anyway.
*: Dungeoneering/Chivalry/Questing-all-rolled-into-one project... I doubt this acronym will last.
The last few days the weather has been somewhat... wet. Which meant no painting on the hills.
You see, painting hills (at least the way I do it) I anticipate to be rather messy.
As I want to keep the living room, kitchen and sewing/games room clean of paint-splattered walls, that means painting outside.
Not something I want to do in the rain, especially not during a summer storm!
So, I had a nice sit inside today with my paints. Which resulted in this miniature getting finished:

Well, this is the second hero to get finished for that! (Number one was the female Dwarf Slayer).
And the first of heroes to get/have a retinue.
You see, on the workdesk are 4 archers, 3 spearmen, a Sergeant, herald and squire to follow this violent man around! And now that I have his heraldry figured out (It took me quite a while, and several changes of heart to settle on this colourscheme), they can get painted too.
I just need to finish a few minor conversions on the sergeant and (dismounted version of the) squire.
My plan is to alternate (at random) between painting WHQ miniatures and painting for my own project. The long term plan for my own project is to amass a stable of both Dungeoneering Parties (which are basically small bands of all heroes. My Slayer and a few of her buddies will form one.) and Individual Heroes (Who will get retinues of lesser warriors, like the knight above.). Some groups will most likely blur the line between these two classifications, but we'll see. I mainly plan to assemble groups that I think are interesting rather than stick rigidly to this divide. And ofcourse to collect a menagerie of adversaries, both human and inhuman. :-D
Oh, and Gunbird has successfully lured me back into Samurai... No major disruption, as I'll just add them to my DCQ-a-r-i-1* project as an eastern band of heroes. ;-D I already have a (smallish) pile of them anyway.
*: Dungeoneering/Chivalry/Questing-all-rolled-into-one project... I doubt this acronym will last.
zaterdag 20 juli 2013
Hills: an update
I did continue to work on those hills off and on the past couple of days, but I forgot to post progress....
Here's where I got with the hills when I stopped for the day, last night:
 All bark glued in place, and the base texture glued on. The base texture is just the sand I usually use for basing miniatures, glued on by first painting the hills with watered PVA that had black paint added to it
I also painted the inside of the cave entrance with this mixture:


Here's where I got with the hills when I stopped for the day, last night:
I also painted the inside of the cave entrance with this mixture:
You can't properly see it, because of the Warcaster standing in the way.... Sorry about that. ;-)
You can see though, that the PVA and sand didn't cover everything.
That has been remedied by the next step in the process, which I completed today:
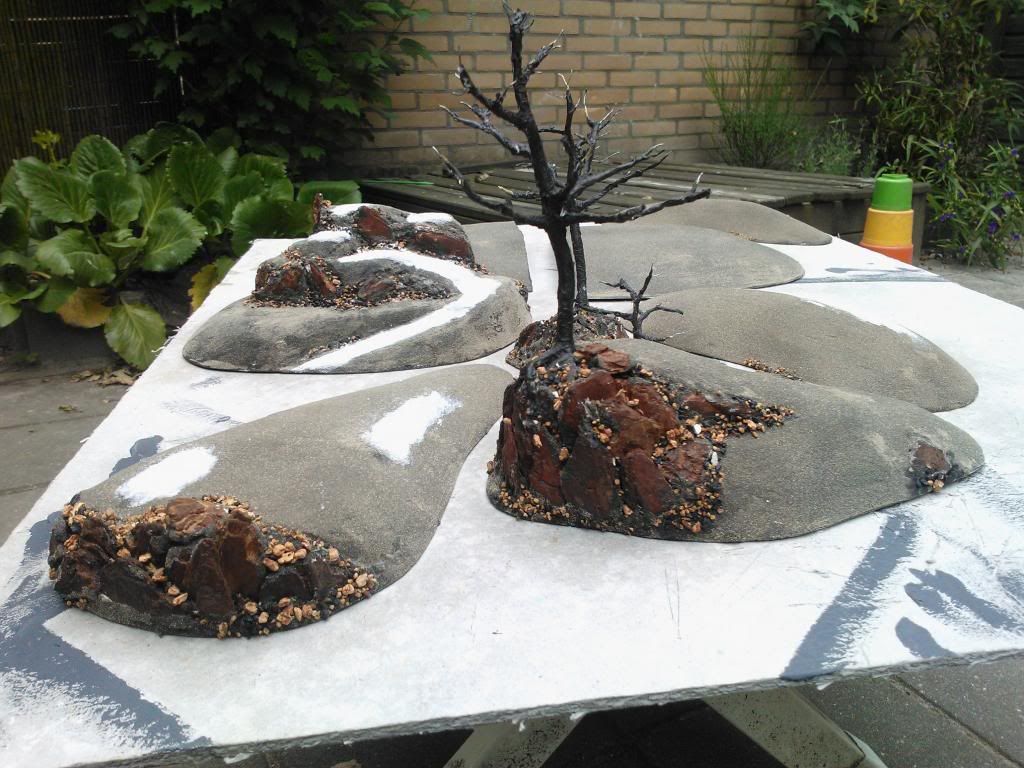
Extra texture!
I added ground cork and fine grit basing gravel to the cracks, crannies and other areas where smaller stones might accumulate. Additionally, I used some finer powder in patches to give some extra variation in texture on some of the hills. I hope this works out.
The hills are currently drying outside from a "varnish" layer of glue I sprayed on to fix the smaller rocks and pebbles in place before I can primer them.
Now to figure out how to go about painting them....
See you next time!
woensdag 17 juli 2013
Barking Mad!
Day two of making a mess terrain...
First, a piccie:

Using bark for rocks, and rock-hard putty for bark...
That's what I've done this morning.
Yesterday I puttied up the first tree armature, the one you see on the hill above, and twisted a few more trees. I've also started glueing bark to the hills that need them. And I figured out how to approach a hill a was a bit stuck on.
It's a talll, multi-level hill that I wanted to model like a rocky outcropping that has "softened" somewhat with soil and grass. I got stumped deciding how to approach the one rocky face left to the hill with the small pieces of bark I have to use. This morning it hit me: reduce the amount of rock face to fill! So I went and cut in a cave entrance...
This killed two birds with one stone: It meant I had less surface to cover with tiny pieces of bark, and it gave me a nice cave to use as a monster's lair, or entrance to a tunnel/cave complex.
So, I went and made the cut:

And the other side of it:

As you can see, it is one of my more constructed and "gamey" pieces of terrain I made on this push. I think that was also what was giving me the trouble on deciding how to tackle it.
I had intended to make a tunnel entrance terrain piece later on, but now it just happened naturally. I've glued the bark onto it, since I took those pictures, but you'll have to wait until a next post to see how it turned out, the glue is still setting.
Next stage: Finish the bark on that first tree, the one on the hill, and then proceed to "bark up" more trees! :-P
Edit: Drat! One of the pictures won't show up properly... Anyway, you can also find it here.
dinsdag 16 juli 2013
Guess what's cooking?
Nice weather, couple of days off...
Time to make a mess!!
So I went and got a shiny new stack of styrofoam (XPS to be precise):

(Yes, and a nice spool of wire as well)
The glue on the first few hills is drying at the moment:

Why hills? Well, after close to two decades of gaming, I still didn't have any... <shame> I've been looking over my scenery collection lately, with an eye towards my plans for Quest/Chanson de Geste story-driven skirmish gaming, and I'm in the progress of getting bitten by the Warmachine bug again (curse that Kickstarter...).
Looking over my (rather small) scenery collection, it looked decidedly...flat.
Hence, hills were required. I did a quick google for ideas and quickly decided I didn't like the fast and easy stepped hills. I'm a modeler as much as (if not more than) I am a gamer. I want my games and terrain to look good. During this quest for inspiration, I came across TableTop Terraformer's site, I liked his approach and attitude to hill making, and scenery in general, their stuff is amazing! Ideas, inspiration (and some rough and ready sketches) at the ready, I was set to go.
Sadly I couldn't (economically) find the big chunks of bark he used, so I'll have to make due with smaller bark instead (on the up side, I've got a lifetime supply of that stuff now).
So, about the hills themselves:
The bases are foamed PVC I got for free from a friend. Just enough to make the hills sturdy, but still light and easy to work with. They still need to be surfaced with filler before I can start texturing them. These are just some basic smooth hills, just a bit over an inch tall. I've also got some rocky hills in the works/planned. Once those two groups are done, I'm planning to make two or three larger (about the size of that two-part hill) and taller (2") hills.
This is my first experience with XPS, and I have to say, I love the stuff. Cuts easily and clean (unlike the usual insulation foam, with those downright evil little pellets!), my foamcutter plays very nice with it, giving clean and controlled cuts (again, unlike the insulation foam of Dooom!). Seeing how easy and fun it is to carve, I'm looking forward to trying what else I can make with it. :-)
Oh, and I mentioned a spool of wire somewhere earlier, didn't I?
That's another thing I'm wanting to do: trees. I have several stands of trees, but they are rather, erm, friendly looking:

Rather bright foliage, fairly thin trees, like in a young forest, or city park. They've done fine service for about a decade and a half now, and I'll happily keep using them until they desintegrate.
But I also need some more butch, intimidating trees. After all, questing monsters tend to live in dark and forbidding forests...
That's where the wire comes in, I want to twist it into a collection of trees. (You can see the first tester on the topmost picture of a hill.) As for mounting, I won't put them on nice, flat, park-like bases, like the trees above. I plan to model the "scary" trees on rougher ground: rocks, earth banks and such.
I just need to figure out how to give some trees proper bulk for a "dread king of the woods" type effect.
See you soon, I've got more mess (and terrain) to make!
Abonneren op:
Posts (Atom)